Center Replication
3forge supports real-time data replication between multiple Centers for horizontal scaling. Replication allows Centers to subscribe to one another, and for historical data transfer.
Overview
Center replication allows for data broadcast in one or more Centers to be accessed and visualized in another. There is a variety of reasons to do this, such as:
- Reducing throttling for high-volume data flows
- Building redundancy
- Abstracting computational pipelines
A list of some examples of use cases for replication can be found here.
Center replication is done via the AMIDB Shell Tool and requires the following:
- At least 2 3forge Centers running, either locally (see this guide to configure 2 instances of 3forge on the same machine) or accessible via browser
- The schema of the table of interest defined in both target and source Center(s)
Realtime vs Historical
Replication is a real-time process done on realtime Center tables. The source table must be broadcasting for its information to then be viewed in the recipient Center. Source tables therefore must:
- Be public
- Have the
Broadcastoption enabled (set totrue)
The rate at which updates are pushed from the source Center can be configured when defining its schema, as outlined in the documentation for realtime table creation.
Tip
Configuring the RefreshPeriodMs of the source table will adjust throughput, performance, and how often updates are pushed:
- Lower RefreshPeriodMs means updates are pushed more frequently, which typically means lower throughput
- Higher RefreshPeriodMs generally results in higher throughput and better performance, but fewer updates
To store historical records of a replication in an external database or archive, follow the steps for archiving realtime tables outlined here.
Note
Historical tables do not subscribe to realtime feeds or replications. The data must be manually transferred across or copied via a user-defined procedure, for example: at the end of the day, etc. For more information on how historical databases work, see the in-depth documentation here.
Setup
To replicate from one Center (source) to another (target), you will need the following:
-
The Center port and address of the source Center, e.g:
localhost:3270. -
The source table of interest's schema defined in the target Center.
Tip
The schema of the source table must exist in the target Center for replication. To easily copy table schemas, use the
DESCRIBEkeyword to retrieve the AMI SQL command for the source table:The AMI SQL command output can then be pasted in the AMIDB shell tool in the target Center.
Add the source center and replication to the target using the AMIDB shell tool. The procedures to do so are defined below.
Replication Procedures
Replication is done in the AMIDB Shell Tool using the following 4 procedures:
Add Center
__ADD_CENTER(String centerName String, String url, String certfile, String password)-
Add a Center with the given properties:
centerName(Required): Specified name for center (source)url(Required): Url of center (host: ami.center.port)certfile: Path to the certfile (optional)password: Password if a certfile is given (optional)
Example
Remove Center
__REMOVE_CENTER(String centerName)-
Remove Center by name.
centerName: Name of the center to remove
Example
Add Replication
__ADD_REPLICATION(String definition, String replicationName, String mapping, String options)-
Add a replication (target table) of a source table with the following properties:
-
definition: The source and target table of the intended replication. Syntax should be as follows:"Target_TableName=Source_CenterName.Source_TableName"- Both source and target have the same table name
-
replicationName: Name for the replication wrapped as a String"myReplication"
-
mapping(Optional): Mappings to be applied for the tables Key-value delimited by comma, e.g:"target_col_name=source_col_name"or"act=account,symbol=symbol,value=(px\*qty)"- Pass in null to skip mapping
-
options(Optional): Additional options that can be supplied to the replication:-
"Clear":"Clear=onConnect"or"Clear=onDisconnect"or"Clear=Off"- If configured, determines when the replicated table is cleared
-
"SrcIdColumn=source_col_id"- Named column on the replicated table containing the ID information of data coming from the source Center, e.g:
"SrcIdColumn=source_id" - Use this option to log the AMI-ID of the replicated Center's incoming data
- Useful particularly in cases where one replicated table is subscribed to multiple Centers
- Use in conjunction with
"SrcNameColumn"to have unique identifiers on a given row of data
- Named column on the replicated table containing the ID information of data coming from the source Center, e.g:
-
"SrcNameColumn=name_of_replicated_column"- Named column on the replicated table containing information of the source Center, e.g:
"SrcNameColumn=source_center" - Use this option to log which Center the replicated data has come from
- Useful particularly in cases where one replicated table is subscribed to multiple Centers
- Use in conjunction with
"SrcIdColumn"to have unique identifiers on a given row of data
Note
Options should be supplied in a single string parameter. Each option should be comma-delineated with no space.
- Named column on the replicated table containing information of the source Center, e.g:
-
Example
-
Remove Replication
__REMOVE_REPLICATION(String replicationName)-
Remove a named replication table.
replicationName: Name of replication to remove
Example
SHOW Commands
SHOW CENTERS-
Shows properties of all replication sources. Properties shown include:
CenterName(String)URL(String)CertFile(String)Password(String)Status(String): shows whether the replication source is connected or notReplicatedTables(int): Number of replicated tablesReplicatedRows(int): Number of replicated rows
SHOW REPLICATIONS-
Shows properties of all replications. Properties shown include:
ReplicationName(String)TargetTable(String)SourceCenter(String)SourceTable(String)Mapping(String): shows the mapping for the replicationOptions(String): shows options to clear replications onReplicatedRows(int): Number of replicated rowsStatus(String): shows whether a successful connection is established to the target table
Note
Removing the replication will clear all the copied entries on the target side's table, regardless of the options.
Realtime Replication
Example
The following is a simple guide for setting up a realtime replication from one Center to another, both hosted on the same local machine.
Warning
It is vital that all the ports listed in this document are unique to each center instance to avoid port conflicts, otherwise one or both of the centers may fail to start.
-
Set up two 3forge Center instances with the following ports defined in
local.properties:- Source Center:
- Target Center:
-
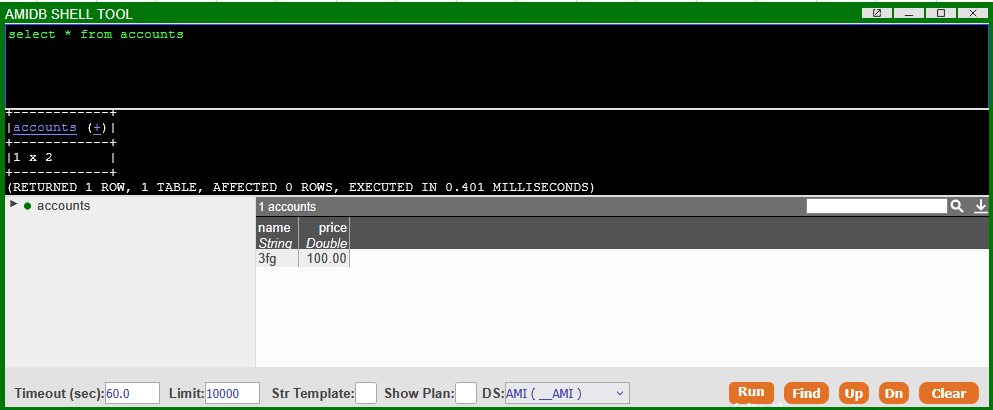
In the AMIDB shell tool of the source Center, define and insert a value into the following table on your source Center:
-
Enter the following command in the target Center's AMIDB shell tool:
This creates a new callable Center in the target Center named
source, which is hosted on port3270of the local machine. -
Define the target table schema in the target Center:
-
Replicate
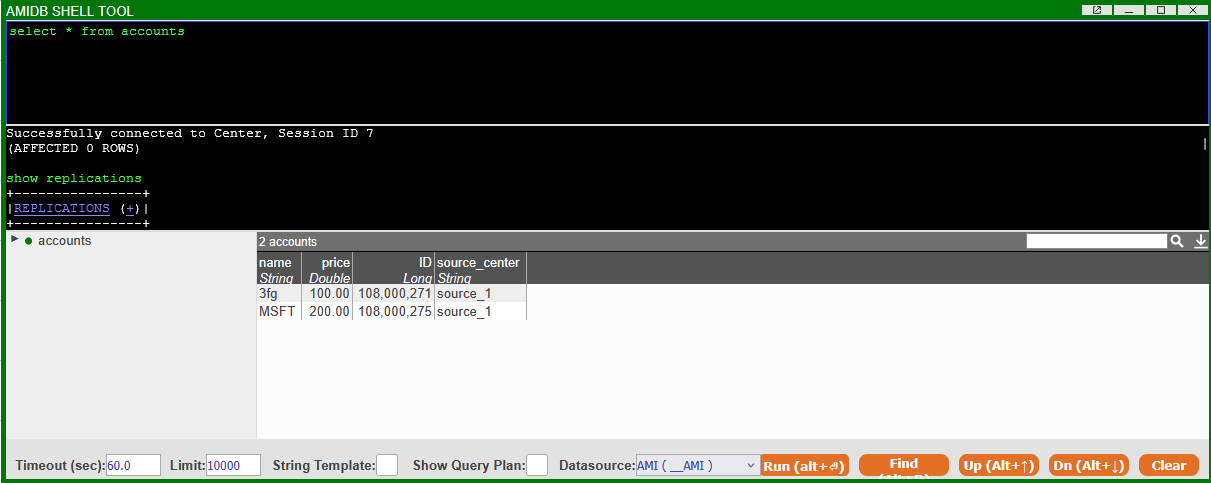
accountsfrom source to target with this command in the target Center's shell tool:
The table accounts from the source Center should now be visible within the target Center. We can verify this by using SHOW TABLES, or SELECT * FROM accounts in the target Center's shell tool.
Replication from Multiple Centers
Multiple Centers can subscribe to one another. If the same source table schema exists on two different source Centers, it can be helpful to have a record of which Center that data arrived from.
In the target Center, you will need to create the table schema for the replicated table as well as adding the following two columns:
- A String type column to specify which Center the row of data is from
- A Long type column to specify the ID of the row of the data (from the perspective of the source Center)
Note
The order of these two columns do not matter, but you will need to make sure that you note the column names down exactly.
These columns can then be passed into the create replication procedure via the "options" parameter.
Example
-
Assuming you have the table
accountswith two columns:nameandpricein the source(s), enter in the target Center AMIDB shell tool: -
Add the source Center(s) to the target Center as shown in the previous example. Create a new replication with the following options:
Running SELECT * FROM accounts in the target Center will now show the accounts table with our new columns:
Note
The source ID is the AMI-ID of the source column. If you include the AMI-ID of the target table, these values will not be the same.
Using the source ID and name in combination returns a unique identifier for that row of data.
AMI Center Persist Files
Creating replications will update these two persist files in the amione/persist directory:
__REPLICATION.dat__CENTER.dat
These files are responsible for maintaining the replication and information on connected Centers.
Warning
We do not recommend modifying the contents of these files manually. These files may have strict formatting and could cause serious issues if altered incorrectly.
Persist File Location
By default, persist files are located in the amione/persist directory of the target Center.
To store the files in a different directory, configure your local.properties file with the following:
or for the persist system tables (tables that start with underbars (__)):
This will change the path for the whole persist directory. To change only the __REPLICATION.dat and __CENTER.dat locations, add the following properties to your local.properties file:
File Format
__REPLICATION.datFormat:-
__CENTER.datFormat:-
Historical Archive
While Center replication is a real-time process, users may wish to store replicated data into a historical database or archive.
The principles behind this are the same as saving regular realtime tables into 3forge's HDB, outlined here.
A historical table does not subscribe to a realtime feed from the source Center. The data must be manually transferred across, or some procedure executed to copy the data at some given time frame.
Note
Historical data archival does not use 3forge's inbuilt system procedures, but requires the user to define their own procedure to copy the data across with some condition (e.g, timeframe). We have an example listed below.
For more information on how historical databases work, see the in-depth documentation here.
Requirements
Tranferring historical data from one Center to another requires the following:
- A source table in some Center
- A target Center containing the historical table
Historical Archive Example
This example shows how to write a simple Center procedure that can be used to move items from a realtime replicated table into a historical database.
- The source Center contains a public table with some the following schema:
-
- Similarly, in the historical Center, we have a table with the same name but a different schema:
-
We have added two new columns to the target/historical table:
HistDateSourceD
Note
D is an auto-generated incrementing unique id for the row which unique across all tables (see Reserved Columns on Public Tables).
Next, we will use the below procedure to transfer the historical data. The arguments for the procedure are as follows:
-
tableName: The table we will be transferring data from and to (ie. DataTable). -
histCenter: The name of the datasource where the historical data will be sent to. -
whereClause: The conditional argument that can be used to define which data to transfer.- E.g:
where Date == 20220101
- E.g:
-
batchSize: The argument to specify the number of data rows to send in each batch.
This procedure uses column D to decide which data to send.
The procedure:
To copy and paste directly into the shell tool: