AmiScript: Custom Classes
Overview
AmiScript is an object oriented language with declarable objects according to different class types, each with their own associated methods.
Many of these classes are familiar, e.g: data types like Int, while others are unique to AMI to maximize developer customizability options.
3forge supports the implementation of user-written custom classes, backed by Java code, which can be imported into AMI.
Setup
Creating custom AmiScript classes follows the same general setup as other custom Java plugins. The key steps are:
- Write the custom class in Java, implementing the necessary interfaces (listed below).
- Export the class(es) to a
.jarfile. - Add the
.jarto theamione/libdirectory of the AMI installation. - Configure
local.propertiesto load the custom class(es).
Requirements
The Java classes must implement the following:
-
Reference the
out.jarandautocode.jarlibraries in the build path of the project. The instructions for this can be found in setting up custom plugins. -
The
com.f1.ami.amicommon.customobjects.AmiScriptAccessibleannotation- This ensures that constructors and other methods are accessible via AmiScript
- Allows for overriding of the name of a method and its parameters within AMI
-
Extend the
com.f1.ami.amicommon.library.AmiAbstractLibraryPluginplugin- Custom classes are treated by AMI as plugins and need an associated unique plugin ID to be loaded in AMI
-
The name of the Java class must start with the prefix
Ami- This allows for AMI to pick up the custom class
- E.g: the
MyClass.javawould need to beAmiMyClass.java
Properties
Custom AmiScript classes and objects can be made available in both Center (AMIDB) and Web.
This can be configured with the following two properties:
Note
You must configure both properties to have the custom class accessible in both Center and Web.
To have the class available in either Center or Web, set the property for only the respective component.
Example: A Calculator Class
This is a basic guide that shows how to create a simple Calculator object.
Setup
Follow the general steps laid out above.
-
Create a Java package called "main" within your IDE of choice and add the following to your
This will make the calculator available in both Web and Centerlocal.propertiesfile: -
Within the package "main", create the class file
AmiCalculator.java. Add theout.jarandautocode.jarfiles to the classpath of the project. -
Import the following libraries into
AmiCalculator.javaclass file: -
Follow the instructions below for implementing the logic in
AmiCalculator.java.
Java Files
AmiCalculator.java
Within this class, we need to do the following:
- Extend the existing
AmiAbstractLibraryPluginlibrary to enable integration into AMI as an external plugin - Define the calculator AmiScript class, methods, and how it is called in AMI using
AmiScriptAccessiblenotation
Create the class AmiCalculator which extends AmiAbstractLibraryPlugin. There are two inherited plugin methods that this class will then override:
getPluginId()init()
Now, we need to define the class' functionality within AmiScript. The AmiScriptAccessible notation enables the class to be accessible within AMI. The following parameters can be set this way:
name: the name of the method or class as called in AmiScriptparams: the name of the parameters as they are called in AmiScripthelp: the helper text associated to that method or class in AmiScript
Add the following annotations and methods to AmiCalculator.java:
The class should now be callable in AMI as Calculator with a constructor and a method named add().
Export Calculator into 3forge
Export the package as a .jar file into the amione/lib directory of your 3forge installation. Ensure that the fully qualified class names of the calculator are listed correctly in local.properties:
The Calculator class should now be available in both Center and Web when AMI is next launched.
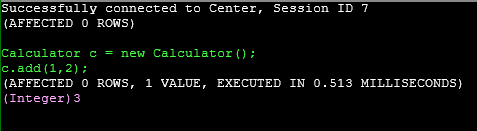
Center (AMIDB)
Within the AMIDB shell tool, run the following command:
You should see the following output:
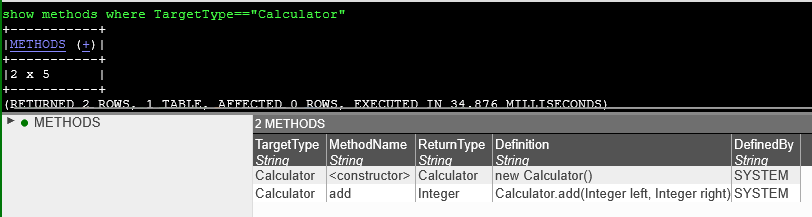
Within the same shell tool, check what methods are available:
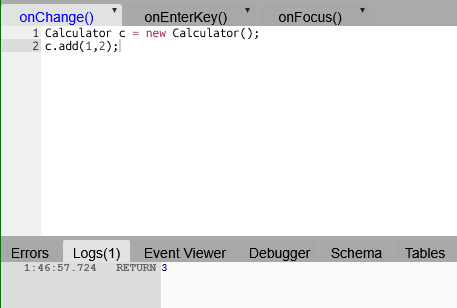
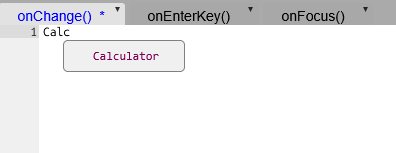
Web
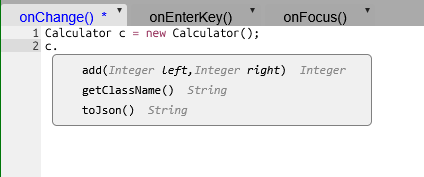
In any window that takes AmiScript, begin creating a Calculator object. You should find that as you type, AMI will autocomplete and find your Calculator class:
Similarly, any methods should also automatically be suggested:
For the same AmiScript as the AMIDB tool, you should see the following output when tested in Web: