# Must be exact. Assumes a Kafka feed handler named "kafka"
ami.relay.fh.active=ssocket,kafka
ami.relay.fh.kafka.class=com.f1.ami.relay.fh.kafka.AmiKafkaFH
ami.relay.fh.kafka.props.key.deserializer=org.apache.kafka.common.serialization.StringDeserializer

# insert the hostname of your Kafka server here
ami.relay.fh.kafka.props.bootstrap.servers=<HOSTNAME>:9092

# insert the comma-delimited topic names being used for Kafka e.g. topic-1,topic-2,topic-3
ami.relay.fh.kafka.props.topics=<TOPIC_NAME(S)>

# insert a consumer group id string (in case other processes are consuming from the same topics additionally, use that group id).E.g. test-group
ami.relay.fh.kafka.props.group.id=<GROUP ID>

# Select one of the deserializers below depending on your message format
ami.relay.fh.kafka.props.value.deserializer=io.confluent.kafka.serializers.KafkaJsonDeserializer
ami.relay.fh.kafka.props.value.deserializer=io.confluent.kafka.serializers.KafkaAvroDeserializer
ami.relay.fh.kafka.props.value.deserializer=io.confluent.kafka.serializers.protobuf.KafkaProtobufDeserializer

# Alternatively, use a custom deserializer class and helper factory
ami.relay.fh.kafka.props.value.deserializer=<fully_qualified_class_name>
ami.relay.fh.kafka.props.helper.factory.class=<fully_qualified_class_name>
# auto commit
ami.relay.fh.kafka.props.enable.auto.commit=true

# insert the hostname of your kafka server running schema registry here
ami.relay.fh.kafka.props.schema.registry=http://<HOSTNAME>:8081

# kafka id to identify your consumer
ami.relay.fh.kafka.props.client.id=<CLIENTID>

# What to do when there is no initial offset in Kafka or if the current offset does not exist any more on the server. Options include earliest, latest, none. Where earliest consumes from beginning of the topic partition while latest consumes from end of topic partition which is default.
ami.relay.fh.kafka.props.auto.offset.reset=<OPTION>

# SASL mechanism used for client connections - defaults to GSSAPI
ami.relay.fh.kafka.props.sasl.mechanism=<SASL_MECHANISM>

# Protocol used to communicate with brokers. Valid values are: PLAINTEXT, SSL, SASL_PLAINTEXT, SASL_SSL - defaults to PLAINTEXT
ami.relay.fh.kafka.props.security.protocol=<PROTOCOL>

# JAAS login context parameters for SASL connections in the format used by JAAS configuration files - defaults to null
ami.relay.fh.kafka.props.sasl.jaas.config=<SASL_JAAS_CONFIG>

# Fully-qualified class name for custom sasl login callback handler
ami.relay.fh.kafka.props.sasl.login.callback.handler.class=<CLASSNAME>

# AMI uses Kafka record keys as AMI message keys by default (same key Kafka records get upserted). Set to false to ignore Kafka record keys and send to AMI without key - default true
ami.relay.fh.kafka.props.use.record.key=<true/false>

# Enable debug logging for consumer polls - defaults to false
ami.relay.fh.kafka.props.enable.debug.log=<true/false>

# Custom properties can also be passed to the Kafka Consumer Client that you want to connect to using the following format: (Refer to Kafka Consumer Configuration documentation on available properties)
ami.relay.fh.kafka.props.<CUSTOM_PROPERTY>=<CUSTOM_VALUE>

# Max number of records per poll - defaults to 500
ami.relay.fh.kafka.props.max.poll.records=5000

# Decide whether the feed handler should stop when it receives an invalid record - defaults to true
ami.relay.fh.kafka.props.stop.consumption.on.invalid.record=false

# Mapping a named AMI table kafka1 to a named topic from Kafka. If the AMI table doesn't exist, it will be created
ami.relay.fh.kafka.props.amiTableMap=kafkatopic=amitable
Note
Table mapping is only supported in version 22094 or later.
# Set deserializer class
ami.relay.fh.kafka.props.value.deserializer=com.amazonaws.services.schemaregistry.deserializers.GlueSchemaRegistryKafkaDeserializer

# AWS Region
ami.relay.fh.kafka.props.region=us-east-1

# AWS Glue Registry Name
ami.relay.fh.kafka.props.registry.name=<NAME_OF_GLUE_REGISTRY>

# Kafka record type (for Avro only)
ami.relay.fh.kafka.props.avroRecordType=GENERIC_RECORD

# Use built-in Avro helper class
ami.relay.fh.kafka.props.helper.class=com.f1.ami.relay.fh.kafka.AmiKafkaHelperAvro
To use different message types, AMI supports integration of custom Kafka deserializers.
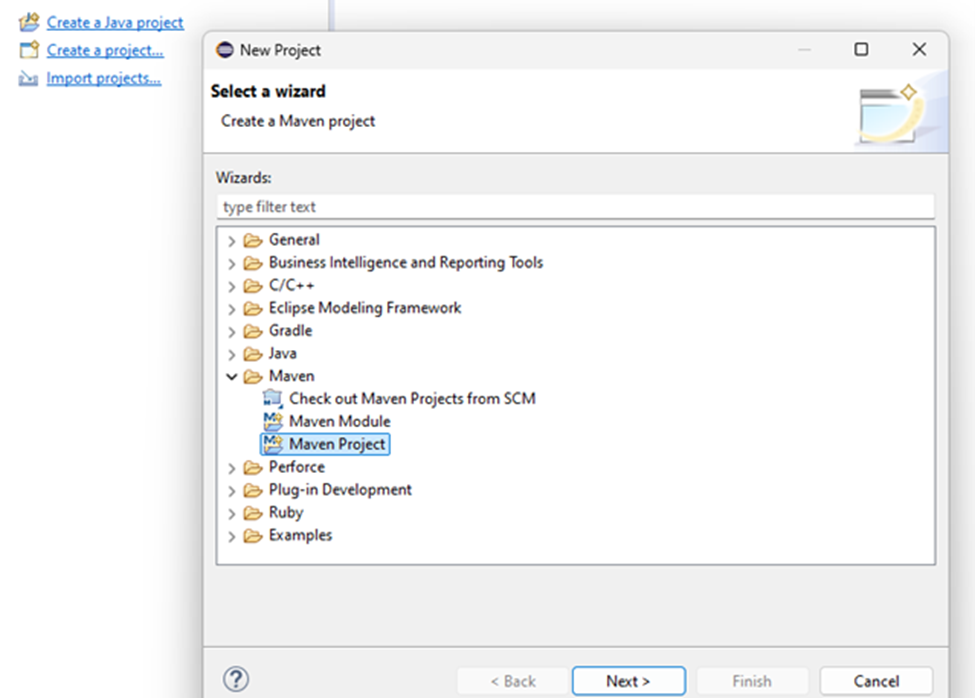
You will need to create a Java project using steps similar to our custom Java plugins.
The key steps are:
Defining the message format.
Creating the custom deserializer.
Creating a custom helper class to pass the deserialized messages to AMI.
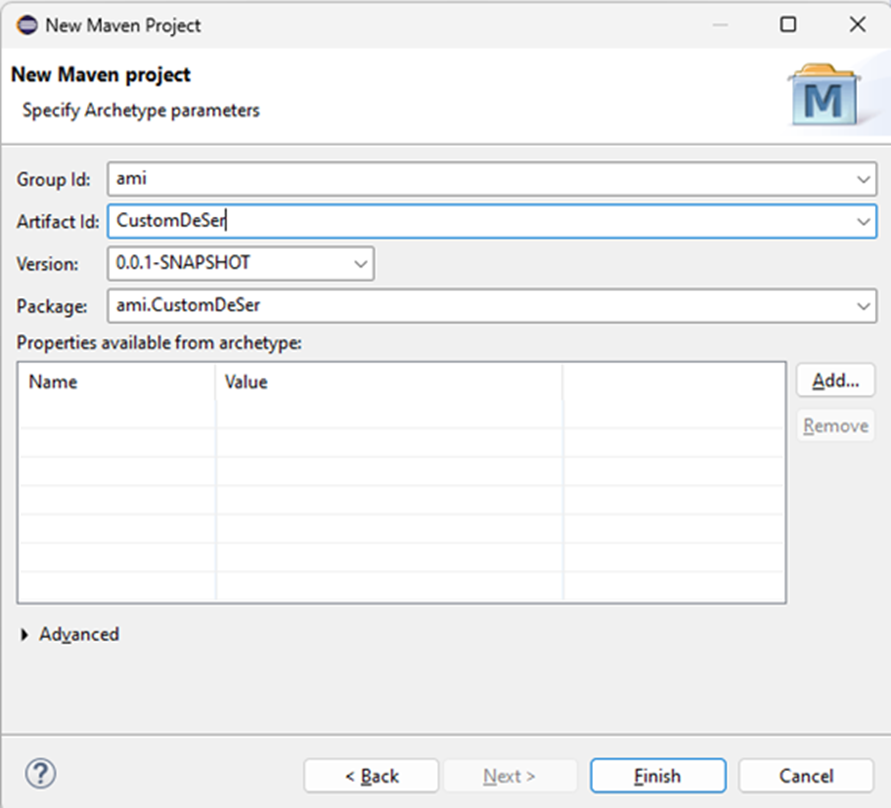
Shown below is a basic example of how to implement this in a Maven project using eclipse. You will need to include the AMI Kafka jar into the project build path which contains necessary methods and classes. Contact us at support@3forge.com to request this.
packageami.CustomDeSer;//Sample Message format.publicclassUser{privateLongid;privateStringuserName;privateStringfirstName;privateStringlastName;privateintage;publicUser(){}publicUser(Longid,StringuserName,StringfirstName,StringlastName,intage){super();this.id=id;this.userName=userName;this.firstName=firstName;this.lastName=lastName;this.age=age;}/* * (non-Javadoc) * * @see java.lang.Object#toString() */@OverridepublicStringtoString(){return"User [id="+id+", userName="+userName+", firstName="+firstName+", lastName="+lastName+", age="+age+"]";}/** * @return the id */publicLonggetId(){returnid;}/** * @param id * the id to set */publicvoidsetId(Longid){this.id=id;}/** * @return the userName */publicStringgetUserName(){returnuserName;}/** * @param userName * the userName to set */publicvoidsetUserName(StringuserName){this.userName=userName;}/** * @return the firstName */publicStringgetFirstName(){returnfirstName;}/** * @param firstName * the firstName to set */publicvoidsetFirstName(StringfirstName){this.firstName=firstName;}/** * @return the lastName */publicStringgetLastName(){returnlastName;}/** * @param lastName * the lastName to set */publicvoidsetLastName(StringlastName){this.lastName=lastName;}/** * @return the age */publicintgetAge(){returnage;}/** * @param age * the age to set */publicvoidsetAge(intage){this.age=age;}}
To write the deserializer requires both Kafka's Deserializer package and AMI's AmiKafkaHelper, which is provided internally as part of the AMI Kafka adapter.
The AMI helper is needed to convert the messages into an AMI-readable format.
The general form for a basic deserializer can be copied from below and is sufficient for this example.
packageami.CustomDeSer;importjava.util.Map;importorg.apache.kafka.common.serialization.Deserializer;importcom.f1.ami.relay.fh.kafka.AmiKafkaHelper;importcom.fasterxml.jackson.databind.ObjectMapper;publicclassUserDeserializerextendsAmiKafkaHelperimplementsDeserializer<User>{publicvoidclose(){}publicvoidconfigure(Map<String,?>configs,booleanisKey){}publicUserdeserialize(Stringtopic,byte[]data){ObjectMappermapper=newObjectMapper();Useruser=null;try{//Deserializer logic goes here including any additional checks/logic you needuser=mapper.readValue(data,User.class);}catch(Exceptione){e.printStackTrace();}returnuser;}}
packageami.CustomDeSer;importjava.util.Map;importjava.util.Map.Entry;importcom.f1.ami.relay.fh.kafka.AmiKafkaHelper;importcom.fasterxml.jackson.core.type.TypeReference;importcom.fasterxml.jackson.databind.ObjectMapper;publicclassAmiKafkaHelperCustomextendsAmiKafkaHelper{@OverridepublicObjecttoReadable(Objectv){// TODO Auto-generated method stubreturnsuper.toReadable(v);}@Override// parse message is responsible for sending messages to AMI to populate the tablepublicbooleanparseMessage(Objectvalue,Map<String,Object>parts,StringBuildererrorSink){// casting the polled data to a JSON mapObjectMappermapper=newObjectMapper();Map<String,Object>deserializedJson=mapper.convertValue(value,newTypeReference<Map<String,Object>>(){});try{for(Entry<String,Object>field:deserializedJson.entrySet()){ObjectfieldValue=field.getValue();// making each field 'readable'parts.put(field.getKey(),toReadable(fieldValue));}}catch(Exceptione){errorSink.append(e.getMessage());returnfalse;}returntrue;}}
This example uses the ObjectMapper() function from JacksonXML to parse the object into a map, which AMI can then read. This information is then used to populate tables with the correct data types.
The AMI Kafka helper is loaded based on the deserializer class property set in the local.properties file. Using the custom helper factory allows you to have multiple AMI custom helpers.
In the example provided, there is only one deserializer, which is added to the factory.
packageami.CustomDeSer;importcom.f1.ami.relay.fh.kafka.AmiKafkaHelper;importcom.f1.ami.relay.fh.kafka.AmiKafkaHelperFactory;publicclassAmiKafkaHelperFactoryCustomextendsAmiKafkaHelperFactory{publicAmiKafkaHelpergetKafkaHelper(StringclassName){switch(className){//Must be exact qualified path name to custom deserializercase"ami.CustomDeSer.UserDeserializer":returnnewAmiKafkaHelperCustom();default:returnnull;}}}
Ensure that that the path name is the exact qualified path name to the custom deserializer.