Users & Sessions
There are a number of settings in 3forge for fine-tuning the user experience on a session or user basis. This page contains information on how to set individual user and session preferences.
Users
Permissions
Permission control for different user groups can be done within 3forge such that only entitled users can see given windows in a dashboard.
For example, assuming admin and non-admin users, developers can use the Custom Callbacks feature to ensure appropriate user access:
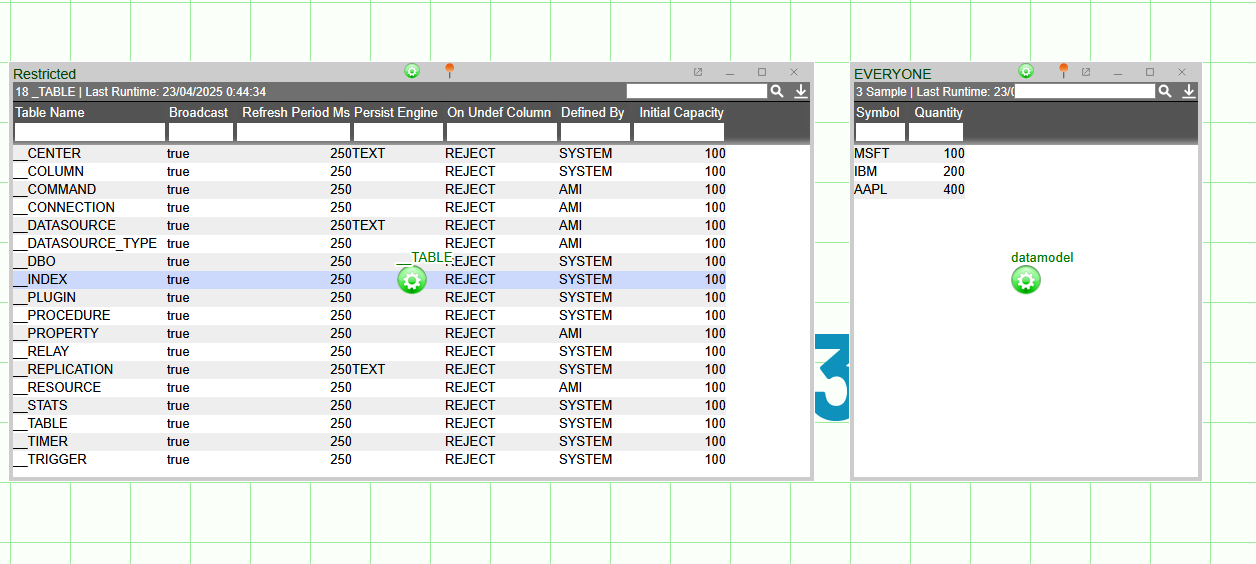
For these two windows, only admins should be able to access the "Restricted" window. To set this up, see the instructions below.
-
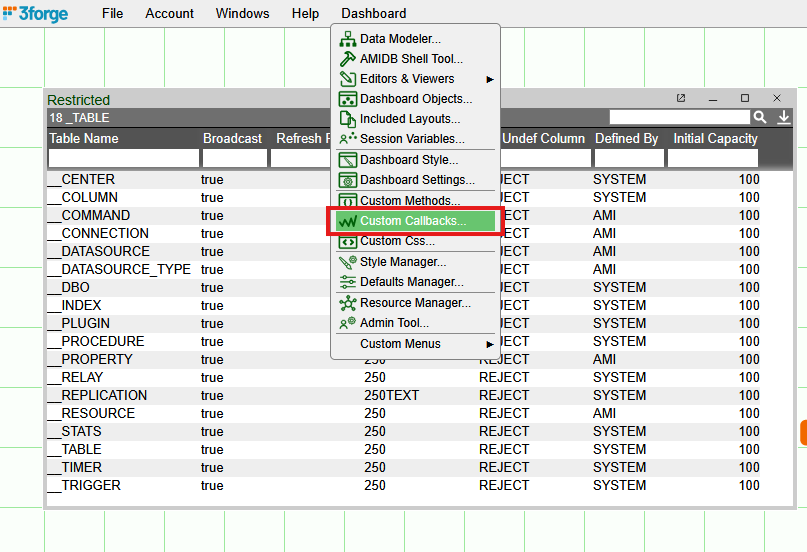
In developer mode, go to Dashboard -> Custom Callbacks.
-
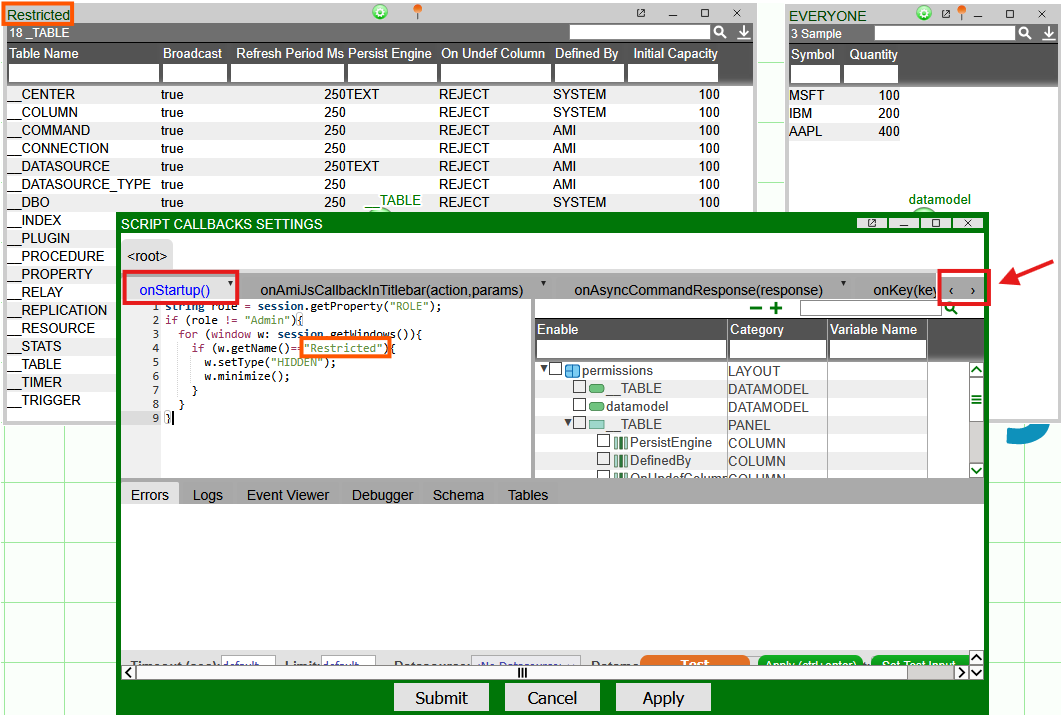
Navigate to the onStartup() tab and input the below AmiScript:
-
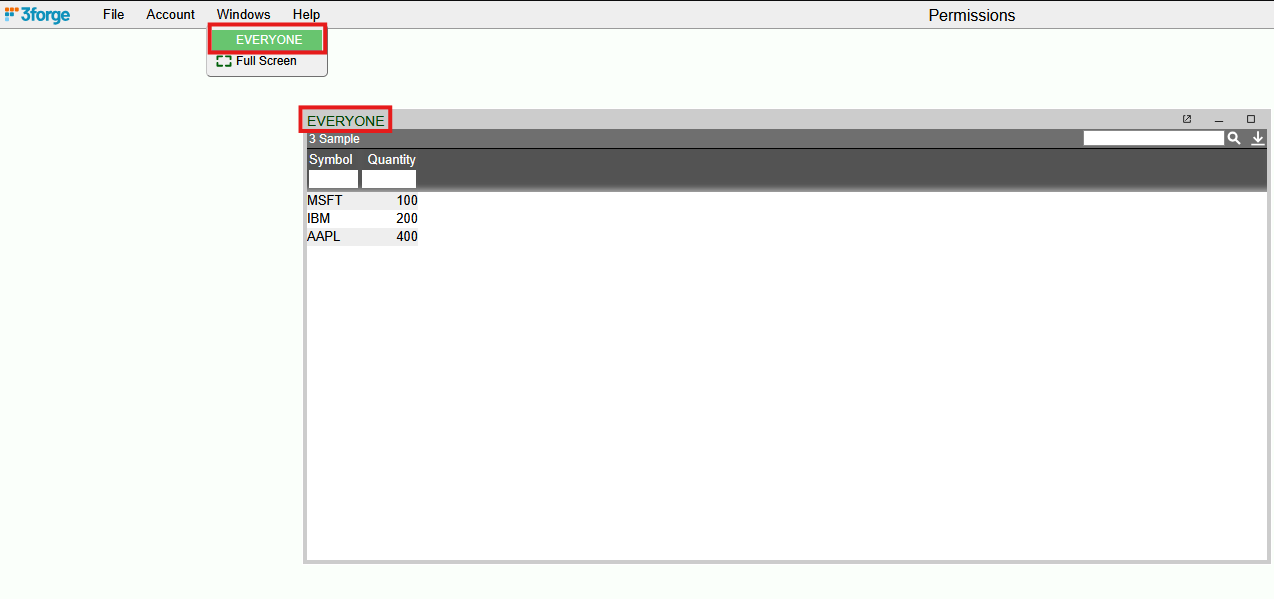
Press "Submit." You should now find that non-admin/developer users cannot see the "Restricted" window:
Note
This example assumes the only user groups are admins and non-admins.
For more realistic user permissions, we recommend using the custom entitlements plugin to define the different user roles and then implement your custom callbacks accordingly.
Preferences
Dashboards can be shared among several users, however each individual user may have their own preferences they wish to implement on a shared file. This can apply to things like window scaling and position, divider settings, and the visual state of some table.
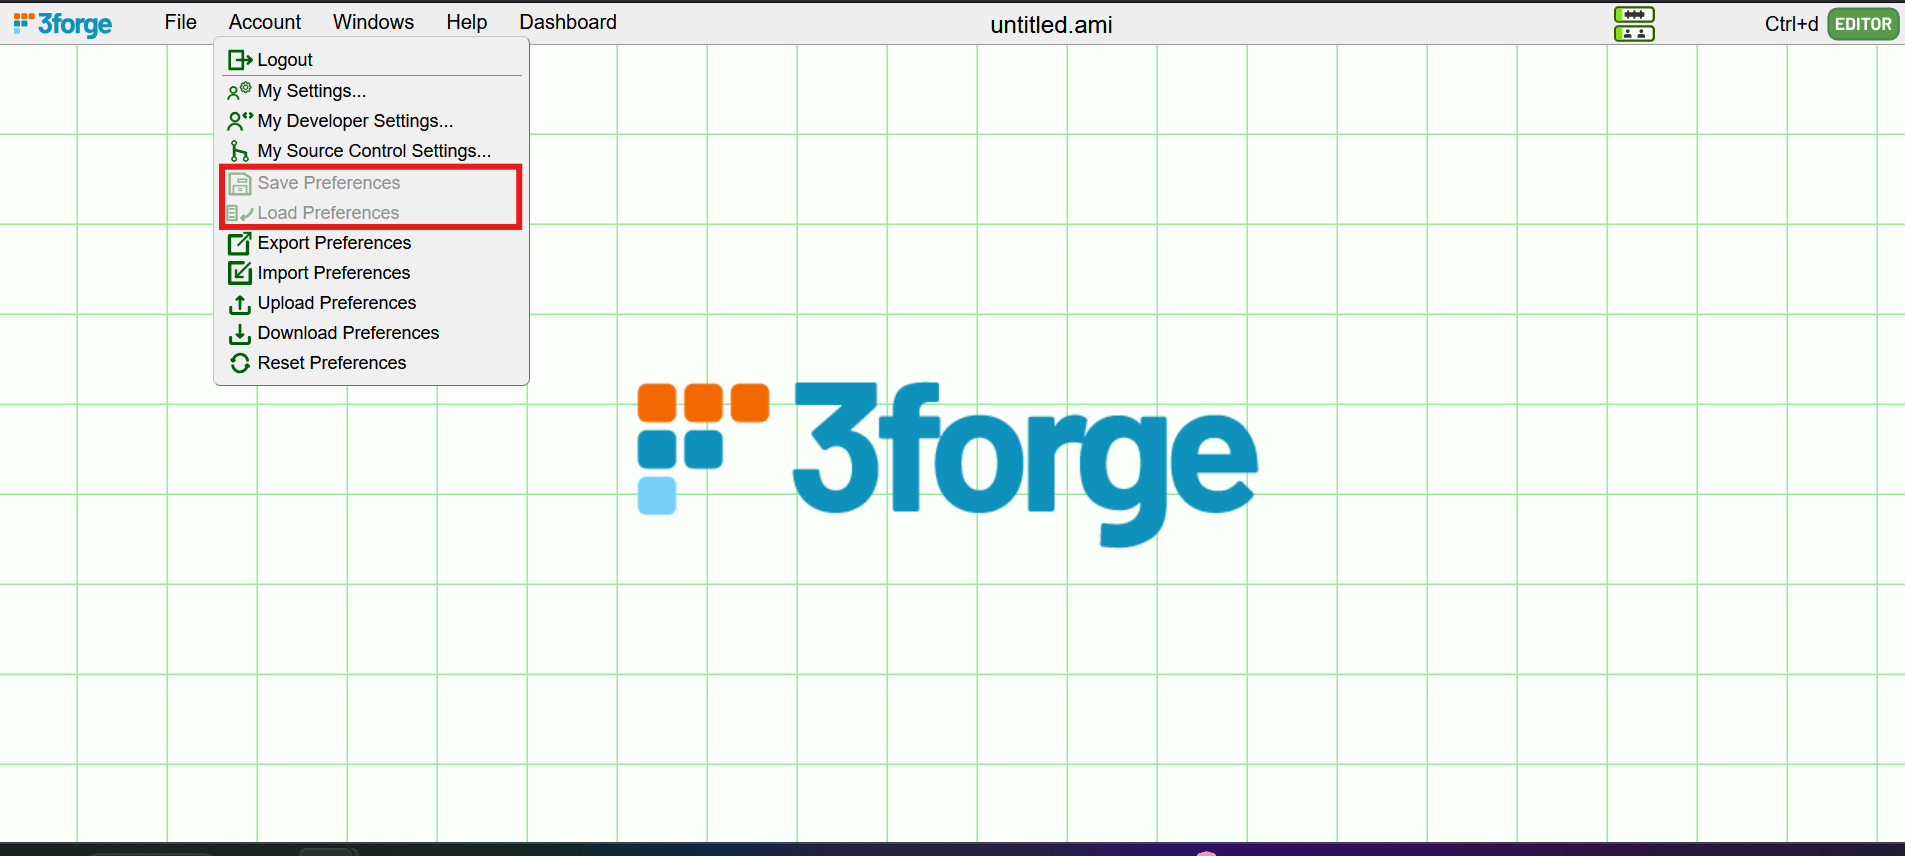
If user preferences are not enabled, when navigating to Accounts->My Developer Settings, you will see the following options grayed out.
To set up user preferences, a developer will need to assign a "namespace" to that given layout.
Setup
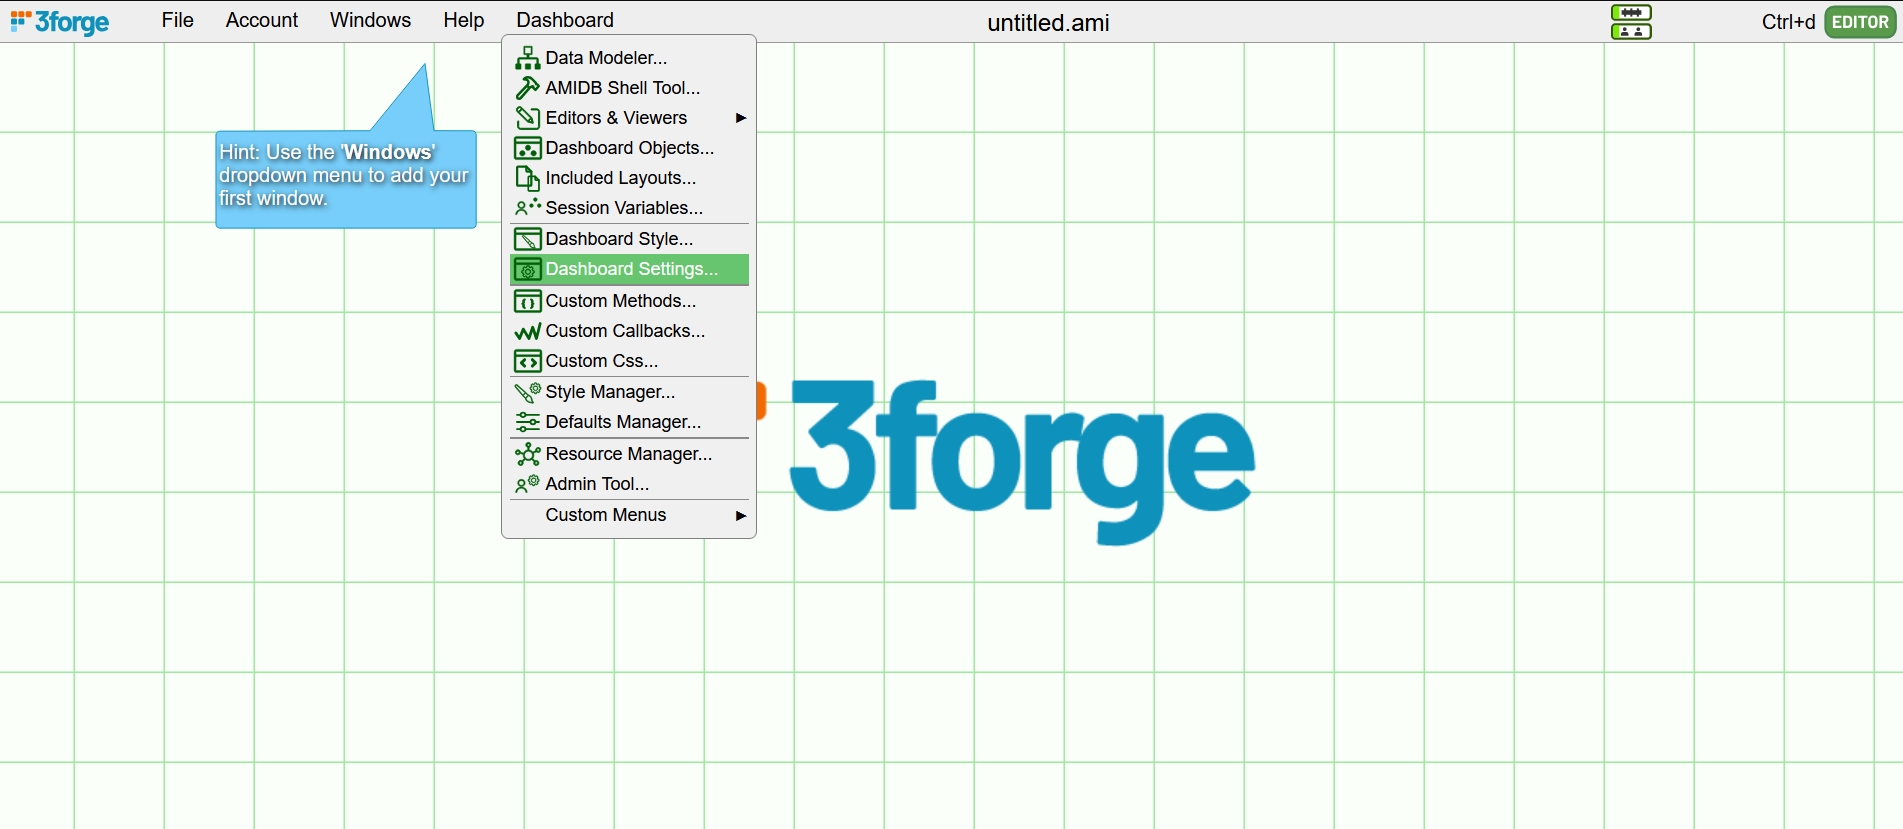
In developer mode (i.e, a user with developer permissions), navigate to Dashboard->Dashboard Settings with the layout that you want to have individual user preferences for.
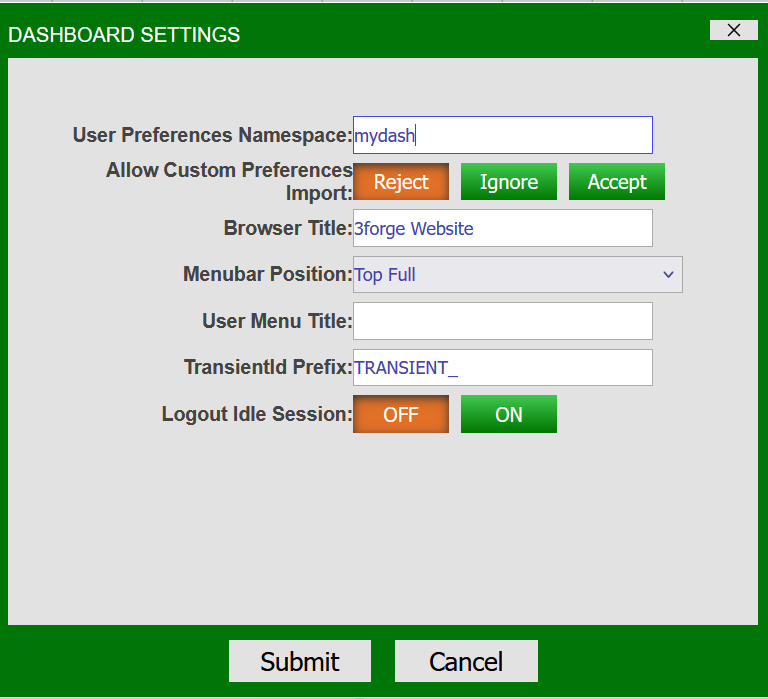
Enter a namespace for the dashboard. This namespace will be used to save an individual user's preferences to the folder amione/data/users after they've logged in.
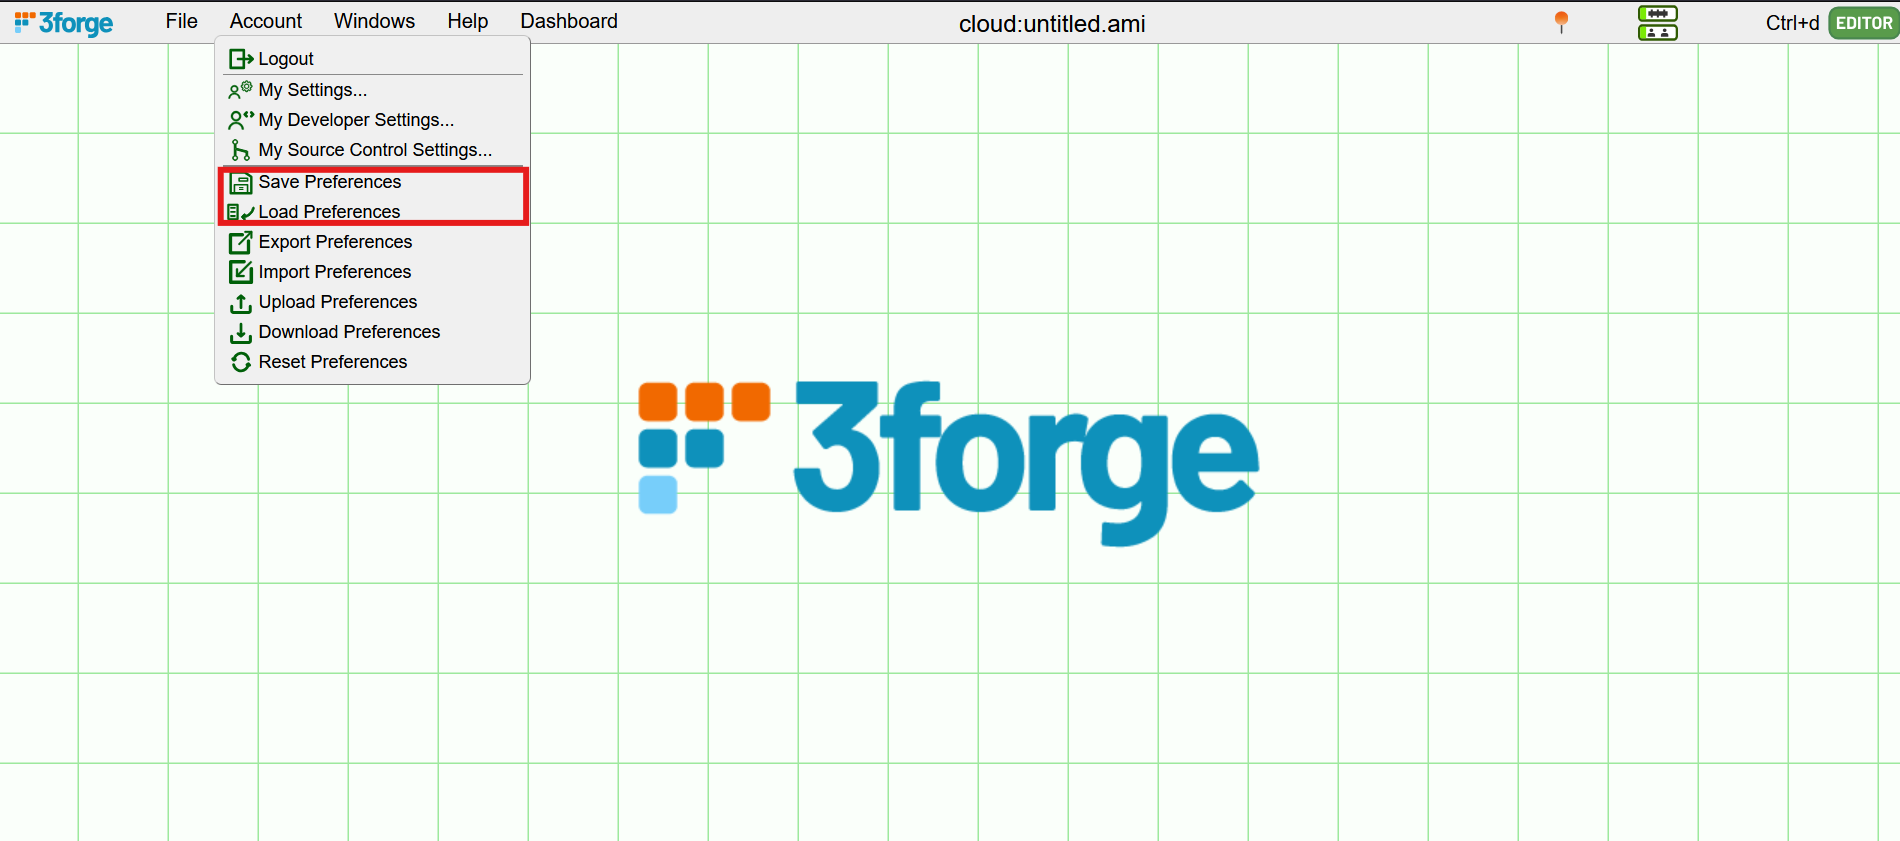
Where previously the preferences selections were grayed out, they should now be clickable. This is how a user can save their preferences.
Save Preferences
To save the dashboard state, navigate to Account->Save Preferences. When logging back into 3forge with that user, you will be prompted to load the dashboard according to the previous preferences.
Each user will have their own preferences on the state of a dashboard, but this will not impact other users' version of the same dashboard.
The saved preferences are stored in the users folder, by default located in amione/data/users with the format:
These files can also be used to import/export different user preferences.
Note
Only users with dev permissions can set a namespace for a dashboard. Regular users will not be able to access or see this, but their preferences will be saved to file accordingly.
Settings
There a number of settings that are similar to preferences that can be used to set default behaviors in 3forge for different users.
These settings correspond to a number of things, like timezones, certain developer options, and other formatting options.
There are a few ways to set this:
- Programmatically:
- Default settings for an 3forge instance which can be set in
local.properties - For more information, see here
- Default settings for an 3forge instance which can be set in
- Via
access.txt:- Supply user settings as pipe-delimited variables
- For example:
timeZone=ACT
- Via the user
ami_settingsfile:- Found under
amione/data/users - These are JSON files with key-value pairs for specific settings
- For example,
"timeZone":"ACT"
- Found under
- Within 3forge itself:
- Under Account -> My Settings for user settings
- Under Account -> Developer Settings for developer settings (dev users only)
Below is a table containing the current configurable user settings.
| Setting | Description | Example (ami_settings File) |
|---|---|---|
ami_layout_current |
|
"ami_layout_current":"untitled.ami" |
ami_layout_current_source |
|
"ami_layout_current_source":"ABSOLUTE" |
developer_ami_editor_keyboard |
|
"developer_ami_editor_keyboard":"vi" |
developer_export_setting |
|
"developer_export_setting":"compact" |
developer_logout |
|
"developer_logout":"Debug" |
debug_info_setting_key |
|
"debug_info_setting_key":"debug_only" |
debug_warning_setting_key |
|
"debug_warning_setting_key":"always" |
developer_headers |
|
"developer_headers":"developer_headers_expand" |
show_setting_divider |
|
"show_setting_divider":"show_editor" |
show_style_editor_tabs |
|
"show_style_editor_tabs":"hide_editor" |
show_autosave_prompt |
|
"show_autosave_prompt":"developer_autosave_show" |
These settings are primarily intended for developers and generally affect the developer experience in 3forge.
For more general user settings which determines things like number formats and other preferences, see the below table.
Note
The settings in this table are the same as the ones listed in the configuration guide and can be programmatically set to assign the default values for that 3forge session.
| Setting | Description | Example (ami_settings File) |
|---|---|---|
dateFormat |
|
"dateFormat":"dd/MM/yyyy" |
timeFormat |
|
"timeFormat":"hh:mm" |
timeZone |
|
"timeZone":"EST5EDT" |
numberSeparator |
|
ami.default.user.numberSeparator=1,234,567,890 |
numberDecimalPrecision |
|
"numberDecimalPrecision":"4" |
sciNotDigitsLeft |
|
"sciNotDigitsLeft":"2" |
sciNotDigitsRight |
|
"sciNotDigitsRight":"3" |
numberNegativeFormat |
|
"numberNegativeFormat":"sign" |
spreadSheetFormatOption |
|
"spreadSheetFormatOption":"always" |
autoApplyUserPrefs |
|
"autoApplyUserPrefs":"ask" |
defaultFileBrowserPath |
|
"defaultFileBrowserPath":"C:/mypc/ami/amione" |
Web Resources
Users can upload files and datasources within the Web to a centralized resources hub. This is accessible to those with access to that Web instance and is not limited to the session.
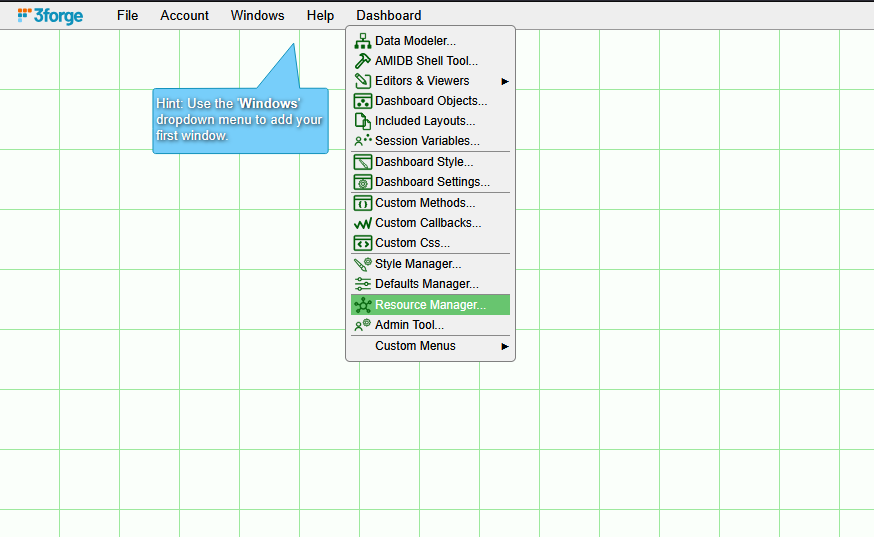
In the Resource Manager window, you can view files available to the web instance as well as upload any of your own files.
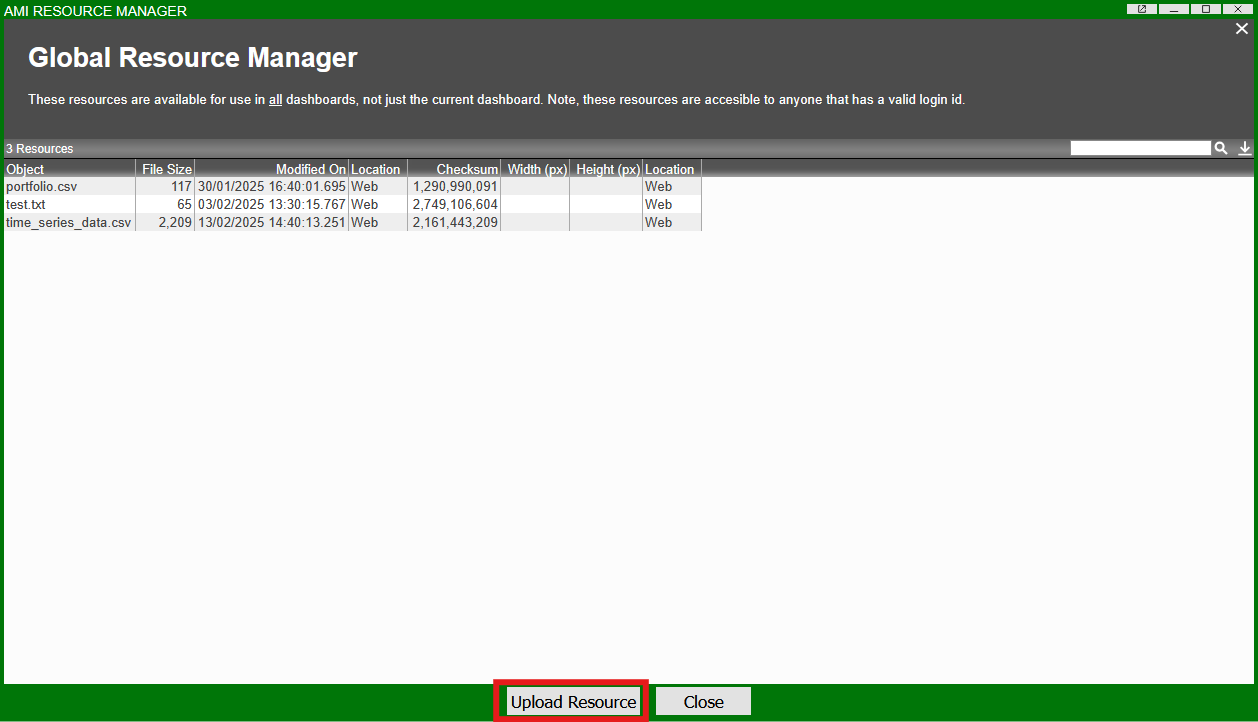
These will then be stored in a web_resources directory of the Web instance's installation, typically under amione/web_resources.
To change this directory, you will need to change the following property to a directory of your choosing:
AMI Center Sessions
Note
Both the Center and Web have and manage sessions which are independent of each other. For Web sessions, see this section.
Sessions manage the various parts of the Center. To view Center session information, run the SHOW SESSIONS command in the AMIDB shell tool:

There are typically 4 different types of AMI Center session:
-
__SYSTEM: effectively the parent session, sitting on top of the session hierarchy. -
__RTFEED: the session that manages all realtime feeds. -
__SCHEDULER: sessions that are associated to timers. Each timer has a unique__SCHEDULERsession associated to it. -
The AMIDB shell tool and any console will also have a session associated to it.
AMI Web Sessions
A Web Session is created every time a user logs in to the frontend dashboard. The session is usually associated to a user login, however it is possible to have headless sessions that are not owned by any given user.
Each Web session has an associated unique __SESSIONID. You can view this within a session's layout via Dashboard -> Session Variables, or through the f1 console.
Note
For more information on retrieving web information via the f1 console, see the section below.
Multiple Sessions
A single AMI instance can have multiple Web sessions:
-
When a user has multiple logins
- A single user can log in and access the same dashboard from different browsers.
-
- E.g, for a user logging into a session from two browsers:

There are two login records (__LOGINID) for the same username in the f1 console.
-
When a user opens or starts multiple sessions within an AMI instance
- Multiple sessions per browser can be configured using the property
ami.web.default.MAXSESSIONS. -
- If set to 2 or higher, a user can create a new session with the same login credentials. This can be done in two ways:
- Within AMI Web, click Account->Start New Session to start a new session in the same browser.
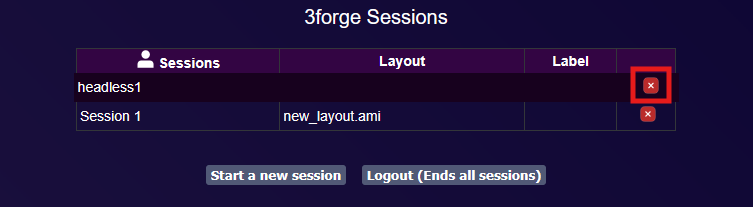
- In the Session Chooser page (after logging in, or accessing the main 3forge application page), click the "Start a new session" button.
-
- E.g, for a user with two sessions in the same browser:

- Multiple sessions per browser can be configured using the property
-
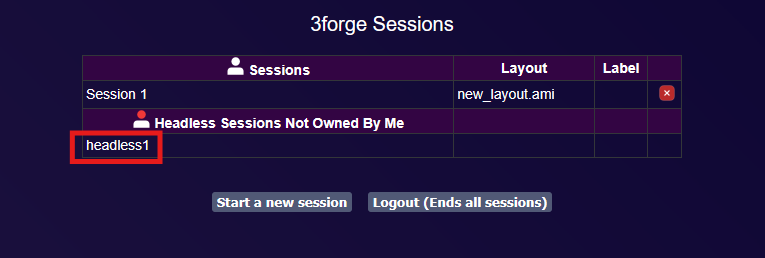
When there are headless sessions associated to the Web instance
- Headless sessions are not associated to a single user but to the Web instance itself.
- Instructions for setting up headless sessions are listed directly in the section below
Headless Sessions
Setup
A headless session is a session that doesn't belong to any one user. Instead, it belongs to the 3forge instance itself. If a user logs out, the headless session will remain available for other users for as long as that instance is active.
To create a headless session, you will need to edit the headless.txt file in amione/data which is supplied by default with a 3forge installation.
The file contains the following text with instructions on using headless sessions:
Uncomment the final line (line 3) to create a headless session with the following properties:
-
headless1- Name of the session
-
headlessdemo- Username of the headless session
-
2000x1000- Screen resolution in width x height of the session
-
ISDEV=true- Permissions of the session
When AMI is next launched, users will be able to access a headless session with these settings.
Note
Headless sessions will auto-start with AMI unless specified. To stop a headless session from automatically starting, prepend it with a ! in headless.txt:
Ownership
To work within a headless session, a user needs to "claim ownership" of that session temporarily. When finished, the session can then be released.
Before any user claims ownership of a headless session, the __LOGINID for a headless session will be null:

- To claim temporary ownership of a session, you can do one of the following:
-
-
Access a headless session via the Session Chooser (this will automatically assign the user ownership)
-
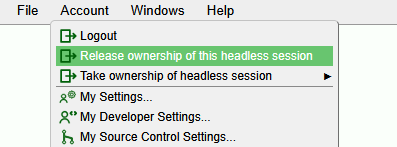
Select the session from within Web via Account->Take ownership of headless session
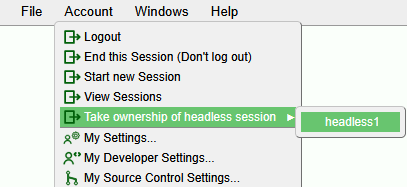
The headless session will now be tied to the current login:

-
- To release ownership of a headless session, you can do one of the following:
-
- Log out (automatically releases the session)
-
Remove the session in the Session Chooser (this will release it, not close it)
-
Release ownership within the Web by clicking Account->Release ownership of headless session.
Managing Web Sessions (f1 Console)
Web sessions can be managed through the f1 console port.
Note
The default port for the f1 console is 3285. You can change this to a different unassigned port in local.properties with the following line:
Once connected to the f1 console port, to log in, run the following command:
- For example, using the default credentials:
Listed below are the available f1 console commands for Web sessions.
JxmWppeScbeRdlRdxGvlSjCIkr
Commands
amiWebServer.showLogins()-
Show all logins.
amiWebServer.showSessions()-
Show all sessions.
amiWebServer.diagnoseSessions()-
Diagnose/Describe key elements in a Web session (datamodels, feeds, panels, etc).
amiWebServer.killSession(String sessionId)-
Kill a user session.
amiWebServer.createHeadlessSession(String sessionName, String username, String resolution, String attributes)-
Creates a headless session with parameters matching the format shown for headless sessions above.
Any attributes should be supplied in a pipe-delimited list of key-value pairs.
Note
This will modify your
headless.txtfile. amiWebServer.disableHeadlessSession(String name)-
Disables a headless session.
amiWebServer.deleteHeadlessSession(String sessionName)-
Delete a headless session. You will need to disable it first with
amiWebServer.disableHeadlessSession(String name). amiWebServer.describeHeadlessSession(String sessionName)-
Print the headless session details as it is saved in
headless.txt. amiWebServer.enableHeadlessSession(String sessionName)-
Enable a headless session.
amiWebServer.killLogin(String uid)-
Kill user login.
amiWebServer.showPanels(String sessionId)-
Show all panels.
amiWebServer.exec(String sessionId, String script)-
Execute AmiScript.
CPU Resource Management
To see if a particular user session is using excessive CPU resources, you can run the following commands:
-
- Run
container_amiWeb.showPartitions()in the f1 console. - This will return a table with the active partitions of the web container.
- Run
-
- To then determine which user corresponds to which ID, use the command:
amiWebServer.showSessions():
The session ID will match to the ID of that user's partition in the web container.
- To then determine which user corresponds to which ID, use the command:
-
You can then kill any logins that are causing excessive overhead with
amiWebServer.killLogin("<__LOGINID>").
Tip
To see a full list of the different methods that can be called in the console for each object, you can run the command show object <AMI_OBJECT>.
For example: show object amiWebServer will return a table of the methods associated with amiWebServer and their descriptions.
Generating Reports
3forge supports converting layout elements like charts, tables, and more into PDF reports. These can be distributed in a number of ways from within a dashboard:
- Saved to a file system
- Sent via email
- Sent to an SFTP server
Create a PDF Report
The AmiScript class PdfBuilder is used to construct PDF documents from within the Web. It can be called from any Web element that takes AmiScript, e.g: a datamodel.
Example
-
Enter the following AmiScript into a datamodel to build a 2-page PDF:
Running the datamodel will do the following:
- Creates a new "reports" directory in
amioneasamione/reports -
Creates a file named
charts yyyy-MM-dd.pdf(replacing the date format with the current date) containing the following:- The text "Hello World" followed by a chart from the layout
- A second page with the text "Some text on the second page!"
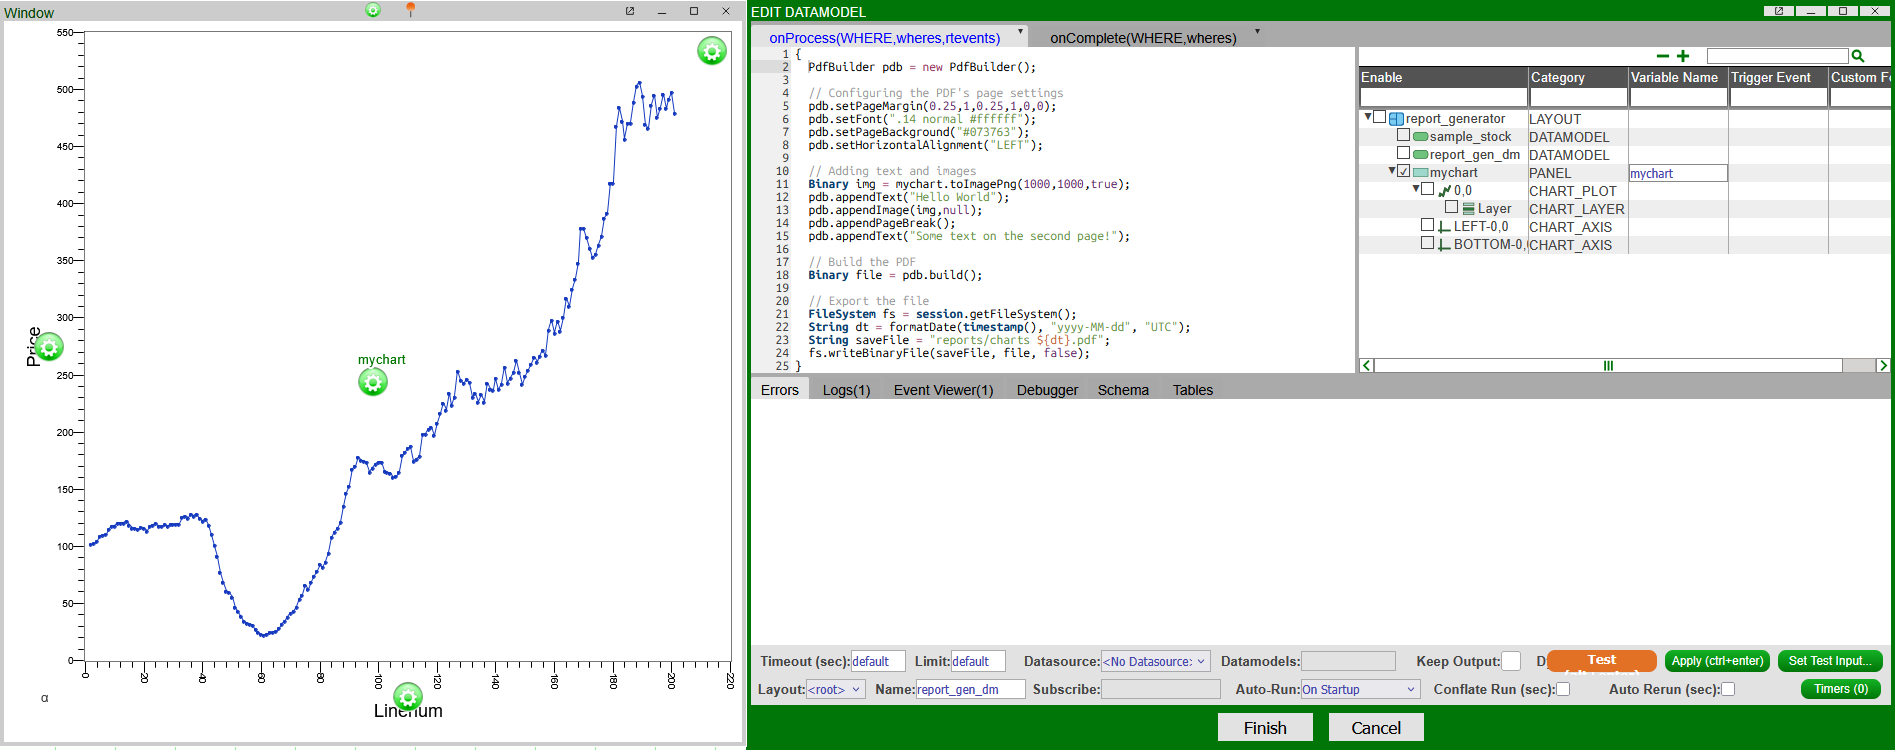
- Creates a new "reports" directory in
Distributing PDF Reports
After building a PDF file in AMI, you can then choose how to distribute that file.
The PDF can be saved to a directory on the local file system. This is demonstrated in the example above.
To save the file locally, you will need a FileSystem object to write the data to disk:
To send reports via email, you will need to configure your 3forge instance for email compatibility. Add the following properties to your local.properties file:
Note
Different email providers have different requirements. Ensure you have configured your email to use SMTP correctly before using it in 3forge.
To send the report via email, add the following AmiScript to your PDF builder, replacing the relevant fields:
The report can also be shared via a SFTP connection using the 3forge SFTP datasource adapter.
Add your SFTP server by navigating to Dashboard -> Data Modeler -> Attach Datasource and select SFTP from the datasource list. Input your server details, then add the following AmiScript to your PDF builder, replacing the datasource name with your details:
This will upload the PDF to the SFTP datasource at the path reports/report.pdf.
Automated Reports with Headless Sessions
Reports can be automatically generated and sent out on schedule from an AMI Web server. This setup uses a datamodel on a timer to generate the reports in a headless session.
By using a headless session, the layout is associated to the Web instance rather than a specific user session. This ensures that even when a user logs out, the datamodel generating reports still continues to run.
Step-by-Step Guide
-
Set up a headless session using the steps above with details like the following:
-
Start 3forge and take ownership of the headless session.
- Create a datamodel for generating the report in Dashboard -> Data Modeler. See the example AmiScript above.
-
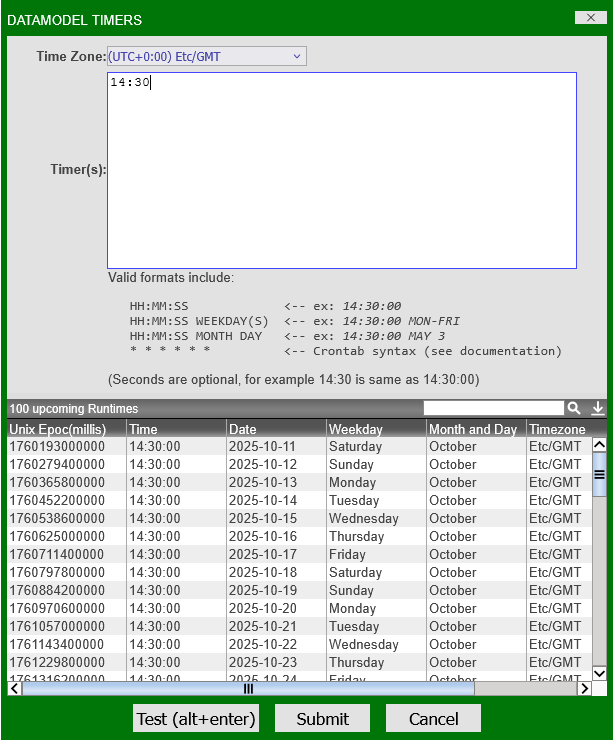
Within the datamodel creation window, set the datamodel to run on a timer by clicking on the "Timers" button in the bottom right-hand side of the wizard:
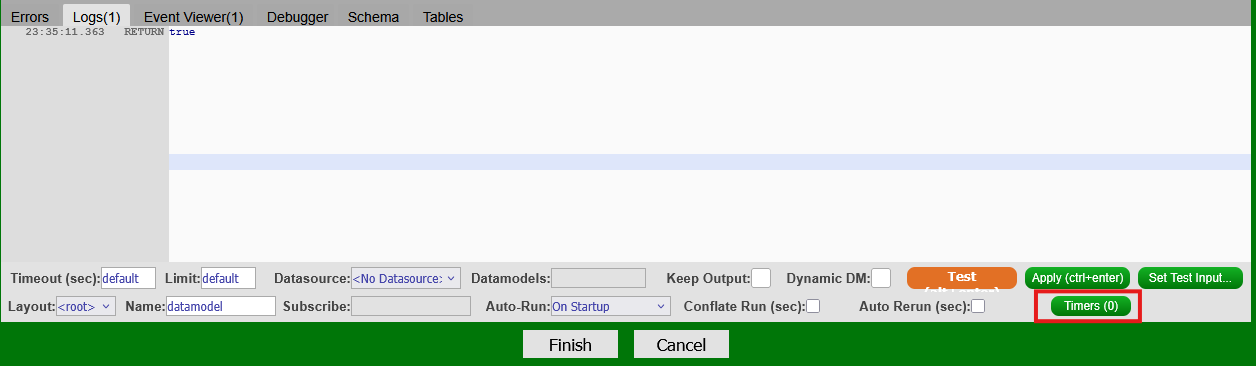
This will open the Timers interface which accepts times or crontab formatted entries. For example:
- The input
14:30:00or14:30will run the datamodel daily at 2:30 PM - The input crontab input
0 */2 * * * *will run every two minutes
Click "Test (alt+enter)" to view upcoming runtimes:
- The input
-
Once configured, submit the timer and finish the datamodel. Save the layout and release the session.
The report generator will now keep running in the headless session.
Embed Charts Directly in Email Body
Charts can also be embedded directly into the body of an email using HTML, rather than as a PDF attachment.
This works by using the AmiScript method sendEmail() and doing the following:
- Converting the chart into an image. The binary information will be passed as the
attachmentDatasparameter. - Embedding the information into HTML which is passed as the
Bodyparameter. - Ensuring that the
isHtmlparameter is set totrue.
Example
-
The body/content of the email corresponds to the HTML description of the embedded chart, contained in the variable
htmlStr. The actual binary data of the chart, supplied as a.pngimage, is sent as the attachment.The filename given to the chart on generation is used as the
cidin the<img src>tag of the email body.
Embed Tables Directly in Email Body
Tables can also be directly embedded into the body of an email using HTML.
Create a custom method that converts the table into an HTML representation, which can then be used in the body of an email.
Example
-
Then call this method on the table you wish to embed:
In this example, both a table and chart are being embedded in the email body, represented by the string variable
htmlStr.