Advanced Setup
Overview
This page contains details for advanced configuration and setup for AMI layouts. For many of these, you will need to configure a local.properties file, the information for which can be found on our configuration pages.
When we refer to adding or changing properties, unless otherwise specified, these will need to be added to your local.properties file. You will need to create or locate this in your AMI root directory at ami/amione/config, otherwise AMI will use the default properties configured in defaults.properties.
For more information, please see the configuration guide.
Advanced Java Configurations
Running AMI on Java 18
By default, AMI expects Java 1.7 or 1.8. For Java 18, should you encounter any Java exceptions, you will need to change the start.sh script located in the root directory of the AMI installation in ami/amione/scripts.
Add these lines to your start.sh:
Using Java G1GC Garbage Collector
By default, AMI uses the CMS Garbage Collector to minimize latency and pause times. If your application requires scalability and efficient memory management, you may opt to use G1GC instead. To change to G1GC, navigate to the root directory where AMI is installed, ami/amione/scripts.
Open the start.sh script, then find and remove the following properties:
Then add this property:
Upgrading AMI Using .tar.gz (Unix & Linux)
For Unix installations, AMI files may be given to you in .tar.gz format. Download this file and navigate to the directory of the AMI installation you wish to upgrade.
Then extract the files into the directory hosting the ami folder to overwrite it. For Linux machines, you can use the following command in terminal to do so:
Note
This command is not reversible and will overwrite your existing ami folder. You may want to backup your 3forge AMI project before proceeding in case you need to rollback.
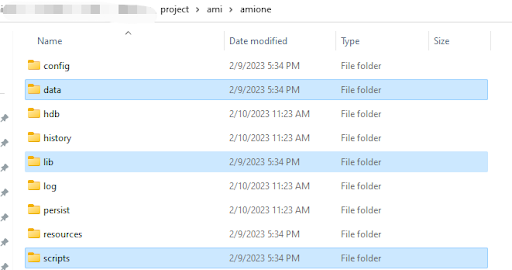
This overwriting process includes the overwrite of the following files (subject to change):
- amione/lib
- amione/data
- amione/scripts
Additional Notes:
-
To avoid modifying the
start.shscript in/scripts, rename or save it elsewhere, then copy it back into the directory -
The following properties files will be updated:
build.properties,defaults.properties,root.properties,speedlogger.properties,AMI_One.vmoptions -
You can use
tar -tvfin terminal to preview the contents of a zip.
Upgrading AMI Using .sh File (Unix & Linux)
Run the installer and select the option to update the existing installation.
Instructions for SSL/TLS
We recommend that you secure your AMI applications, especially if they contain sensitive information. To secure applications via SSL/TLS, you will need to set up a keystore and truststore for your certificates. To generate certificates, use Java's keytool which will be supplied in the AMI installation or your any other Java installation on your machine. Locate where the keytool is (/PATH_TO_YOUR_JDK_DIRECTORY/bin) and add it to your PATH variable.
Then, follow the instructions on generating certificates using keytool by Oracle. For more information on keytool, please see the Oracle documentation (Java 7, Java 8).
Server Example:
To generate a server certificate 3forge_server.cer to give to clients:
You will be prompted to enter the password for your keystore. Configure your options accordingly.
Client Example:
To import the server certificate into the keystore file and generate a key for the user (to be verified by the server):
Note
You will need to export the client certificate and import it into the server.jks. You should also make sure that in the case of multiple clients, each client has a unique client.jks file.
Server Configuration
Ensure that your server keystore is in the correct directory. Then add the following properties to your local.properties:
To configure the client, copy the client.jks file to the client and instead of calling the function AmiClient::start(host, port, loginId, options) call:
Configuring Web, Relay and Center Ports
The AMI core architecture consists of the web, center, and relay. By default, AMI assigns each component ports to listen to, however you may wish to change these in local.properties.
The default port values for each component are listed below.
Console Port
f1.console.port-
Default value:
3285(listens)- The admin console port all components listen to.
- This port can be used to retrieve advanced technical information about your AMI runtime and is necessary for each center to run.
- Please contact us at support@3forge.com if you need to use this port to debug your AMI instances.
AMI Center
ami.center.port-
Default value:
3270(listens)- Sets the port of the primary instance of AMI center for more connections from other AMI Web and Relay instance.
- Also sets the connecting port of relay & web components to this center if configured and launched together.
ami.db.console.port-
Default Value:
3290(listens)- The port for connecting via telnet command line interface.
ami.db.jdbc.port-
Default Value:
3280(listens)- The port for connecting to AMI via the AMI JDBC driver.
AMI Relay
ami.port-
Default Value:
3289(listens)- Sets the port that applications connect to on the Relay's host machine. See AMI Realtime Messages for the messages format AMI expects.
ami.center.port- Default Value:
3270(connects) ami.center.host-
E.g. localhost
- For relay components running separately from the center-- to be configured with
ami.center.host.
- For relay components running separately from the center-- to be configured with
Note: the relay can connect to multiple centers, with a comma-delimited list entry e.g.: ami.centers=center1=host.running.center1:3270,center2=host.running.center2:3270,center3=host.running.center3:3270.
AMI Web
http.port-
Default Value:
33332(listens)- Sets the port that web browsers use to connect to AMI Web.
https.port-
Default Value:
33333(disabled, listens)- Sets the port that web browsers use to connect securely to AMI Web.
https.keystore.file- The path to the key store file generated using java's keytool that will be used for secure web connections.
ami.center.port- Default Value:
3270(connects) ami.center.host-
E.g. localhost
- For web components running separately from the center, to be configured with
ami.center.host.
- For web components running separately from the center, to be configured with
Web Manager
ami.webmanager.port-
Default Value:
3271(disabled, listens)- Optional location for where to access webmanager, used for remotely loading files.
Web Balancer
ami.webbalancer.http.port-
Default Value:
33330(listens)- Optional, the http port to listen for insecure connections on. If not specified, http is not available.
Configure AMI Properties from Environment Variables (Windows)
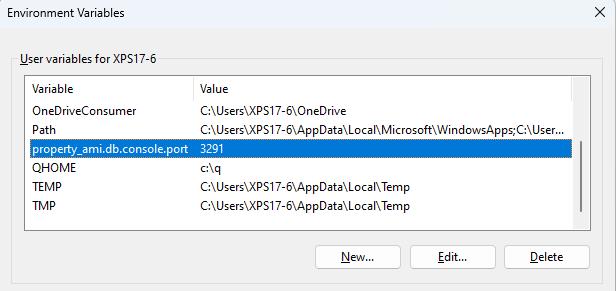
AMI properties can also be configured using system variables if you do not wish to use the local.properties file.
Navigate to 'System Properties -> Environment Variables' and for each AMI property you would normally configure in local.properties, create a new variable following this syntax: property_<AMI Property Name>=<value>.
Note
This is case sensitive, so please ensure that your environment variables match the same syntax of the properties specified in the configuration guide.
This will overwrite the existing property defined in local.properties and apply globally to all AMI instances running on the current machine.
Configuring Multiple Instances on a Single Machine
Multiple instances of AMI can be run on the same machine. Each instance should have its own directory separate to the others, e.g; an ami_project_1 and ami_project_2 directory with an installation in each.
Each additional instance must be configured to use different server ports -- two processes cannot have conflicting server ports. Below is a list of the server ports that need to be configured in the local.properties file of each AMI directory:
- You must always replace the following default port with a new, unique port (or use -1 to disable the console):
- If running the center, you must replace the following default ports with new, unique ports:
- If running the relay, you must replace the following default port with a new, unique port:
- If running the web with secure https socket, you must replace the following default port with new, unique ports:
-
If running the web with non-secure http socket, you must replace the following default port with new, unique ports:
-
You will also need to define a unique cookie identifier for each session that is hosted on the machine:
Running Components Independently
By default, AMI launches the center, relay, and web, but can be configured so that only one or a combination of components is run. If you only require specific components, you will need to configure a local.properties file accordingly.
Note
In the examples, we have used the default ports but you are welcome to assign your own, just ensure there are no port conflicts.
Default
Run the center, relay, and web:
Center
Run only the center:
Relay
Run only the relay:
Web
Run only the web:
Center and Web
Run the center and web:
Center and Relay
Run the center and relay:
Web and Relay
Run the web and relay:
Relay and Multiple Centers
Run the relay connected to multiple centers:
Web and Multiple Centers
Run the web connected to multiple centers:
Additional Notes:
- Port 3270 is the default port that the center listens on and that the web/relay connect to.
- The web server never connects to the relay directly, both are connected via the center.
- The center starts up the primary server port (listener) that multiple clients, either relay or web, can connect to.
- The primary center will be the first center in the delimited list denoted by
ami.centers.
Running AMI with Docker
AMI can be easily configured for use with docker using the following recommended folder configuration:
| Folder | Contents |
|---|---|
| ./ami | Unix installation of ami (ami/amione/...) |
| ./docker | Dockerfile provided below |
| ./scripts | start.sh script provided below |
Sample Dockerfile
Sample start.sh
To build the image:
To run the image (the use of detached mode is optional):


