Waterfall Chart of a Profit Bridge
Known issues
Some chart features have known issues in the current release. See Known issues.
This walkthrough bridges an opening balance of 100 to a closing balance of 118 through 3 steps, answering "What moved the balance?"
Prerequisites
- Editor mode: click once on the screen, then press Ctrl+d. The AMIDB Shell Tool and the gallery are used as in the quickstart.
- Data: the example data that stage 1 creates. To use a table of your own instead, see With your own data.
1. Create the example data
The chart reads a table in the Center, so create the table first.
- Select Dashboard -> AMIDB Shell Tool....
-
Run:
-
Check that the lower pane shows the 5 rows.
Each row is one bar, from the level before its step, "Bar Bottom:", to the level after it, "Bar Top:", so a fall has its top below its bottom. The template computes nothing. It draws a rise in teal and a fall in red, and the first and last bars, the opening and closing balances, in orange. The step names are numbered so that the bars stay in order however the chart is made: the gallery's "Waterfall" draws the rows in the order they arrive, while a waterfall created over MCP sorts the names alphabetically.
2. Create the chart
The gallery creates a datamodel that reads the table, then places the chart.
- Select Windows -> New Window, then the edit button on
Blank1, then "Create Table / Visualization / Form". - Select "AMI (__AMI)", then "Next >>".
- Select the "USER" tile
ChartDemoBridge, then "Next >>". - Select "Test (alt+enter)", then "Next >>".
- Select the "Cartesian" tab, then the "Waterfall" tile.
-
Set the fields below the tiles:
Field Value "Category:" Step"Bar Bottom:" Bottom"Bar Top:" Top"Order by:" Ord -
Select "Finish".
- Check that the window shows 5 bars in step order, "1 Opening" to "5 Closing": the rise in teal, the 2 falls in red, the opening and closing bars in orange, and lines joining each step to the next.
The "Connectors" layer draws a line for each bar after the first, at that bar's "Bar Bottom:" level, from the bar before. So the lines join the steps when each bar's bottom is the level before its step. The closing bar's line runs at 0, along the axis.
Result
An opening bar from 0 to 100, a teal bar for Trading from 100 up to 145, red bars for Fees from 145 down to 130 and for Funding from 130 down to 118, and a closing bar from 0 to 118. Connector lines join the 4 steps.
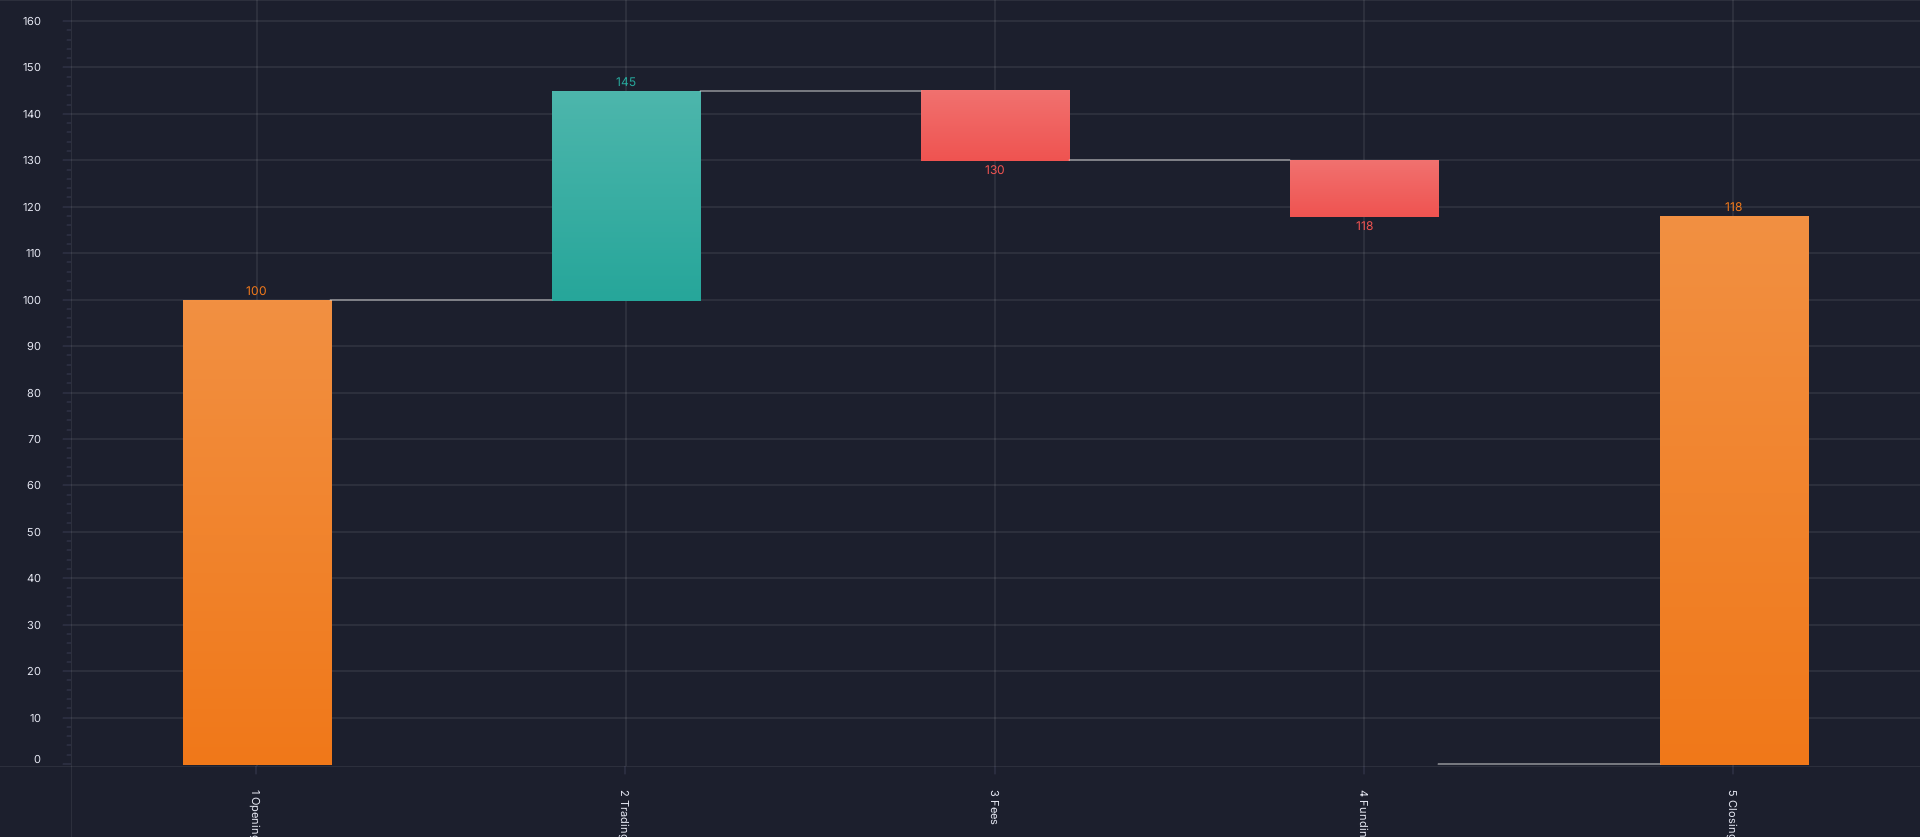
The chart's own PNG export, from AmiScript toImagePng; see Chart type walkthroughs.
To check without looking, read the render stats: session.getDevTools().getAllRenderStats() in the AMIDB Shell Tool, with "Run on this web session" selected (see Running a script), or web_debug op=panelRenderStats over MCP. The "Bars" and "Connectors" layers each report Rows 5 and an empty Problem.
With your own data
If your table holds one signed amount per step, the opening balance first, shape the rows in the datamodel's query. To try it on example rows, run this in the AMIDB Shell Tool first:
Remove it afterwards with DROP TABLE ChartDemoPnlSteps;.
- Follow stage 2 with the "USER" tile
ChartDemoPnlSteps, or the one for your own table, in place ofChartDemoBridge. -
When the gallery shows the datamodel's query, replace the query with:
-
Select "Test (alt+enter)".
- Check that the "Tables" tab shows
ChartDemoBridgealone, with the same 5 rows as the example table in stage 1.
Then continue with stage 2: the fields are the same, and any later stages apply as written. To do this over MCP, put the same statements in the onProcess of the datamodel that step 1 of "Over MCP" imports, with USE ds="AMI" before each EXECUTE.
stack(Amount) is a running total, the level after each step. Each bar runs from the level before its step to the level after it, and the INSERT adds the closing bar, from 0 to the total.
Over MCP
An agent builds the same chart from the same table. Connecting an agent is covered in the AI section; the tools are on Building charts over MCP.
-
Create the datamodel with
web_executeop=importDatamodeland thisdmJson, then run it once withop=initDatamodelSchemaanddmNameChartDemoBridge: -
Create the chart:
-
Run the datamodel again with
web_executeop=executeDatamodel,dmNameChartDemoBridge. A chart created over MCP can stay empty until its datamodel runs again, with its axes at 0-100. - Confirm that every layer reports the rows above and an empty
Problem: runweb_debugop=panelRenderStats.
The call is web_create_chart_from_template. Its reply includes "DATA SHAPE REQUIRED", which this table already meets.
Removing the example
Remove the chart, then its datamodel, then the table, so that the next walkthrough can reuse the names:
- Close the chart's window with its close button, and select "Delete" when asked whether to delete the panel.
- Select Dashboard -> Data Modeler..., expand "Datamodels", right-click the chart's datamodel,
ChartDemoBridge, and select "Delete Datamodel", then "Yes". If that name was taken when stage 2 ran, the gallery added a number to it, as inChartDemoBridge1. - Run
DROP TABLE ChartDemoBridge;in the AMIDB Shell Tool. - Check that
SELECT * FROM ChartDemoBridge;reportsUnknown table: ChartDemoBridge.
Over MCP, delete the chart with web_danger op=deletePanel, then the datamodel with op=deleteDatamodel, dmName ChartDemoBridge, and drop the table as in step 3. deleteDatamodel refuses a datamodel that has been committed; delete that one in the Data Modeler as in step 2. See Removing an agent's chart.